waook, WAOOK, chevaux, course, sport, vla4, v200, trotteur, concours complet, Tracker, Training, Advanced, Harouk, compétition, entraineur, entraîneur, vétérinaire

EN
. Each BLUE label is a clickable menu/feature, it should be consider as a « button »
. Each ORANGE label shows which menu/feature is selected
. Each WHITE field is clickable and can be manually filled
. Each BLUE label is a clickable menu/feature, it should be consider as a « button »
. Each ORANGE label shows which menu/feature is selected
. Each WHITE field is clickable and can be manually filled


. As soon as there is more than 1 first letter for the horses’ names, the letters are displayed here, and the user can select the first letter of the horse he’s looking for and then its name in the list.

. CONFIGURATION: display the configuration Menu (cf CONFIGURATION page) this is where you will adjust color Labels, speed units, Transmitter pairing, Account synchronisation, and later Track management.
. The list of your Horses just appears.
You can create this list yourself by adding new horses one by one, or you can send us an email with an excel file of the requested informations (name, father’s name, mother’s name, year of birth) and we’ll add them for you with our « back office » tool.
. After selecting the Horse you wanna use for the new SESSION click on START.
. Clicking on NEW HORSE will display the following screen: fill the fields and click on ADD to create a new Horse, or on CANCEL if eventually you don’t want to add one.

. All the fields need to be filled.
Be careful to enter the good year of birth as it will be taken in account for the Lactic Profile cursor position in WAOOK TRAINING


. The color of the WAOOK logo is selected in the CONFIGURATION MENU
. The unit of the instant speed is selected in the CONFIGURATION MENU
. The colored Squares are displayed accordingly with the range of the BPM
. This area displays the km done in each BPM ranges
. This area displays the timing, laps per laps (future feature)
. The STOP needs to be maintained until the blue line goes until the extreme right side of the interface, then the WAOOK TRACKER will switch to Horse selection menu


. DISCONNECT : switch back to the Login/password page, useful for changing from one account to the other
. Speed Value : select the unit you want displayed on the WAOOK TRACKER SESSION main page.
. Color Code: select the color of the WAOOK logo displayed on the WAOOK TRACKER SESSION main page, this is an easy way to know which iPhone is paired with which Polar Transmitter, adding same color rubber tape on both Polar Transmitter and iPhone case/iPhone is a good trick to recognize the paired devices even when the App is not launched or the iPhone switched off ;-)
. Sync AUTO BPM: ON = WAOOK TRACKER automatically syncs with the first Polar transmitter found around it when you START a SESSION. OFF = WAOOK TRACKER will stick with the Polar transmitter detected when it was switched OFF. This is useful when you have to work with multiple WAOOK TRACKERs at the same time, to be sure that the good transmitter is properly in sync with the good iPhone ;-)
. GENERATE : clicking on it will generate a temporary QR code that will give the possibility to any WAOOK ADVANCED VET account to get temporary access to the Horses list to easily select them before an effort test for example.
This QR code has a short lifetime, if it has not been scanned by a WAOOK TRACKER Vet account minutes after it has been generated ; then the sync will not be possible. You will have to regenerate a new one by pressing again on GENERATE. This way we avoid permanents access to a Trainer’s Horse list via a simple screen shot ;-)
. SESSION : goes back to the SESSION Page where you can choose your Horse and press START to launch your session

. If during a SESSION WAOOK TRACKER detects that the data connection has been lost, a red banner will appear on the top of the interface as a warning message. This is not a major problem as WAOOK TRACKER will keep all the SESSION’s data in the iPhone’s memory until the launch of a new SESSION with data access. At that time a « Pending data » warning will appear, asking if you want to send all the pending data or not. Generally the good answer is yes « Send » those pending data.
. When this has been done a confirmation message is displayed before continuing

NOTE:
There is no « finish » button in WAOOK user interface, it is to avoid an exit « by mistake ». So if you want to exit WAOOK TRACKER, just kill the application or open an other one.


. In the case of a VET account, you can temporarily ADD a Trainer TEAM to have access of his entire horse list, allowing you to select them easily


Clicking on ADD TEAM will switch on the iPhone’s Camera and WAOOK TRACKER will be looking for a QR code that has been previously generated on the trainer’s WAOOK TRACKER (by clicking on WAOOK TRACKER /CONFIGURATION / GENERATE.)
As soon as WAOOK Tracker detects the QR Code it will surround it with a Green line.
Then the Vet will have the possibility to select this new account for the next 6 hours, WAOOK TRACKER will then show this new Team name in the « select team » page.
. Otherwise the WAOOK TRACKER Vet account will deliver the exact same feature set than a « Regular » account
. Each BLUE label is a clickable menu/feature, it should be consider as a « button »
. Each ORANGE label shows which menu/feature is selected
. Each WHITE field is clickable and can be manually filled
. Each BLUE label is a clickable menu/feature, it should be consider as a « button »
. Each ORANGE label shows which menu/feature is selected
. Each WHITE field is clickable and can be manually filled
From any place with internet access LIVE is displaying with 2/3 seconds of delay what is displayed on the different WAOOK TRACKERs of the same account.
Up to 8 WAOOK TRACKERs can be displayed simultaneously.

. Click to select which unit you prefer, it will only impact the speed display on the iPad, it will not impact what is displayed on the iPhones
. Each WAOOK LOGO color is the one selected on each WAOOK TRACKER
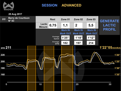
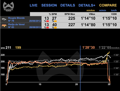
This page will display the different SESSION of the day. Clicking on one will display its curves. White is for BPM, Orange for speed, clicking anywhere on the curve will display the bue head, which you can move by sliding on the curve. The value are simultaneously displayed on top.
Again you can select your speed unit.

NOTE: The Big Orange Cursors + Transparency Area are not displayed in the actual version. This may be added in a future release
To generate a LACTIC PROFILE.


. Lactic Mesure : Simply click on the white fields to fill them with your Lactate Scoot measured values.
. Position the Big Blue Cursor on the curve at the beginning of the Zone01 then click on MARK IN (Zone 01), then position the Big Blue Cursor at the end of Zone01 and then click on Mark OUT.
Then the average Speed and Average BPM between Mark IN and Mark OUT will be calculated and displayed. If necessary, you can also directly modify them by clicking on the white fields and fill them manually.
. Repeat the Zone 01 steps for Zone 02 and Zone 03.
.Then Click on GENERATE LACTIC PROFILE to generate it and WAOOK TRAINING will automatically display the LACTIC PROFILE Page
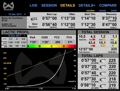
. Clicking on the date will display the calendar, highlighting the date with a SESSION recorded. Select the new date by simply clicking on it.
. Clicking on - or + will display the previous or next recorded SESSION
. Using 2 fingers to pinch will zoom in/out on the curve
. Sliding with 2 fingers will slide the curves if they have been zoomed in.
. Clicking and sliding with 1 finger will display the Big Blue Cursor and display the according value on each top side of the curve
Based on the values you enter and our algorithm, the LACTIC PROFILE is calculated and displayed. By clicking on SAVE you’ll save it into the Trainer account. You can also EXPORT it to any email address.
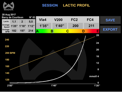


. This little blue cursor indicates if this LACTIC PROFILE is very good (A) or very bad (E). This is estimation is based on our 20 years of measurements. It is important to remember that the « effort test » should been done in conditions as close as possible to racing conditions. It’s particularly important for the track to be comparable to a racing one (fast enough)
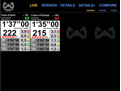
Displays all the relevants information of the selected SESSION (in SESSION page). LACTIC PROFILE is displayed if it has been generated either by the Trainer itself or by a VET after the QR code synchronisation process (see WAOOK TRACKER documentation)


. LAPS informations are not displayed yet as WAOOK TRACKER, « Track calibration feature » is not released yet (planed for the end of summer)
Display the variability of the selected values SESSION after SESSION.
Moving the Blue Cursor will display the different values of the different date on the bottom of the page.


By clicking on the name you will display them ON or OFF
All : display all the values
-25 : display only the 25 previous recorded values
+25 : display only the 25 further recorded values
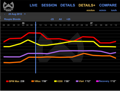
Displays up to 4 curves of 4 different SESSIONS. This is useful to compare similar SESSIONS from either different Horses or same the Horse.
Each selection will be displayed with a dedicated color, to know which curve is from which horse SESSION.


. By clicking on the curves themselves, you can display them ON or OFF.
. Moving the Blue Cursor will display the Number, with the same color code than the one used for the SESSION on the upper part of the interface